
No items found.
The Kelser Foundation donated a record $58,000 to the Hospital for Special Care (HFSC), which it raised at its annual charity golf tournament in Newington.

February 20, 2026
.avif)
.avif)
.avif)
There are so many technology tools that it can be tough to keep them all straight. As a business leader or technology consumer, you don’t need to be an expert in the nitty gritty technology details, but it can be helpful to have a working knowledge and understanding of the tools you use to do your job.
In this article, we’ll explore Proofpoint, a commonly used family of technology tools that helps keep your infrastructure safe.
Again, we understand that you don’t necessarily need (or want) to understand the intricate technology details, so we’ll provide a top-level description of how it works, and explore six essential things every user should know about Proofpoint tools.
We are committed to providing the information you need, in easy-to-digest language. No tech talk here!
After reading this article, you’ll understand why Proofpoint tools are important and how to use them effectively.
Proofpoint is the brand name for a company that provides software as a service and products for email security, identity threat defense, data loss prevention, electronic discovery, and email archiving.
These products protect organizations of all sizes. Other providers offer similar products including Barracuda, Microsoft Defender for M365, and Trend Micro.
Proofpoint tools scan incoming emails for known security threats like spam, phishing, and malware. When suspicious code is spotted in an incoming email, it quarantines that email giving you control over whether or not to deliver the email to your inbox.
Quarantined items are sent to your inbox via a separate email (called a Quarantine Digest) that gives you control over whether the email is delivered, whether you want to preview it first, or whether you want to block this and all future communication from the sender.
This extra step lets you decide which items actually land in your inbox and provides an extra level of security before delivering questionable items.
We answer questions about Proofpoint tools every day. Here are some of the most common questions we hear (and the answers, too):
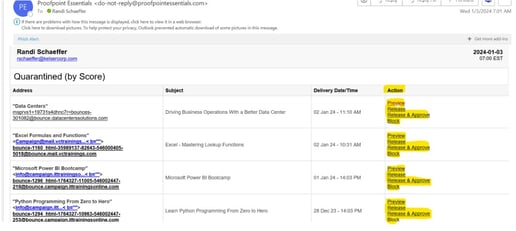
Step 1: Open the Proofpoint Quarantine Digest email. You will see a list of all emails that have been blocked by Proofpoint.
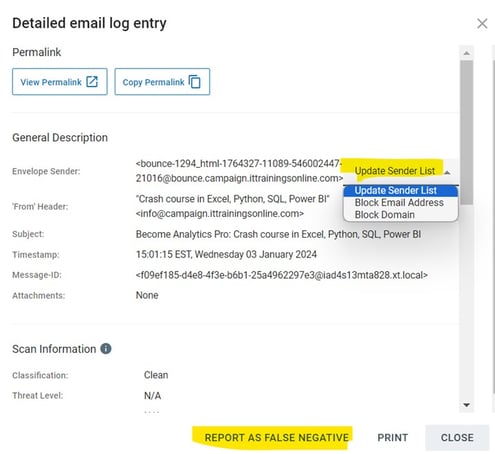
Step 2: Click the "Preview" link on the right side of a specific email to safely open a full preview of the quarantined email for easier viewing.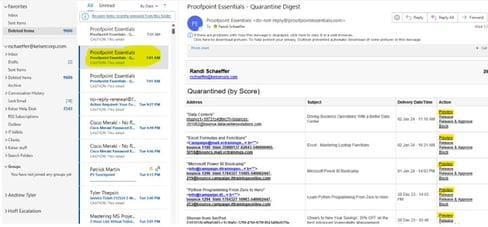
Step 3: The preview will open in a browser window.
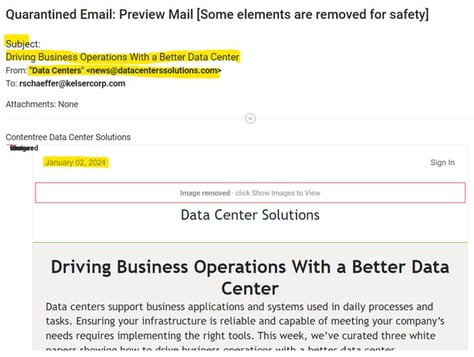
Do you recognize the sender’s email address? Is the email subject familiar to you? What time was the email sent? This information will help you decide when an email message is safe to release (and open).
Step 4: Once you have previewed the item, select from the following options:
Release
When you select “release,” Proofpoint will allow the message to be sent to your email inbox.
Release & Approve
Choosing “release & approve” tells Proofpoint that moving forward, you’d like all messages sent from this email address to go directly to your inbox.
Block
When you block an email address, all future communications from this email will not be sent to you. These messages will no longer show up in your quarantine digest. (Read on for information about reinstating blocked senders).
If you accidentally block an email in Proofpoint, you can retrieve a single email for up to 30 days by logging into your Proofpoint account. (After 30 days, quarantined emails are automatically deleted and cannot be recovered.)
Here’s how to retrieve a blocked email:
Step 1: Go to https://us1.proofpointessentials.com/app/login.php
Step 2: Enter your username and password (contact your IT person if you don’t know your username and/or password and they can help you re-set if necessary)
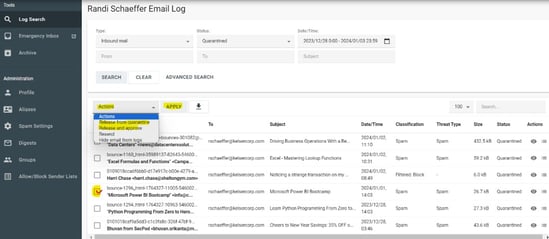
Step 3: Under “Tools”, go to “Log Search”
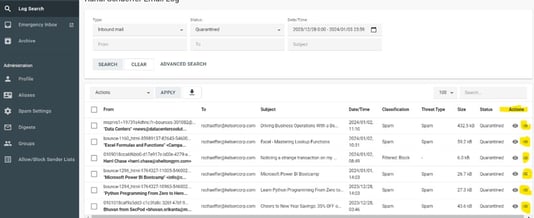
Step 4: Enter the search parameters ("date" and/or “from” and/or “to” and/or “subject”), hit "Search." Your quarantined emails will populate in a list similar to the one below.
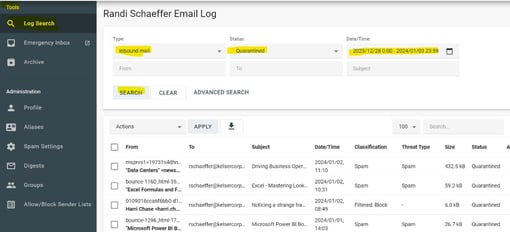
Step 5: There are two ways to restore individual emails, either:
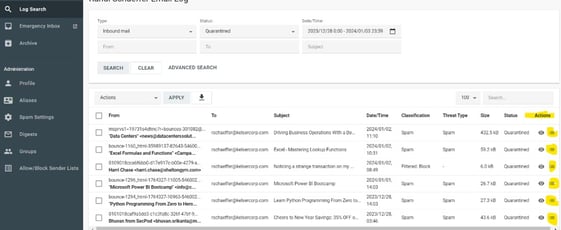
Once you've made your selections, don’t forget to hit “Apply” at the top of the list next to the “Actions” button!
If you accidentally block a sender email address and then want to reinstate the sender, you can move the email address from your blocked to allowed sender list.
Here's what you need to do:
Step 1: Go to https://us1.proofpointessentials.com/app/login.php
Step 2: Enter your username and password (contact your IT person if you don’t know your username and/or password and they can help you re-set if necessary)
Step 3: Scroll to the bottom of the panel on the left and select "Allow/Block Sender Lists"
Step 4: Find the email address you want to reinstate in the "Blocked Sender List" highlight it and move it to the "Safe Sender List"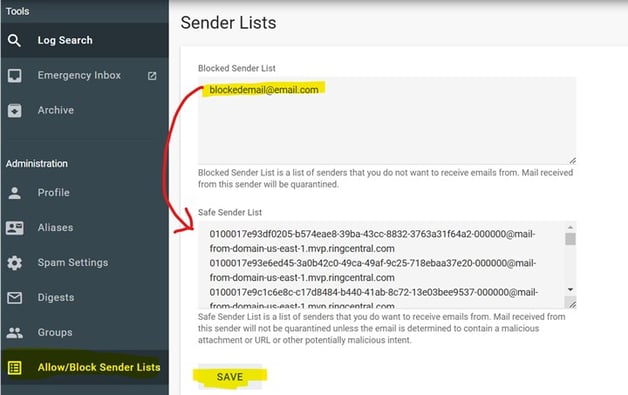
Step 5: Click "Save"
No. Proofpoint is web-based, so you don’t need an app on your computer to use it. It operates quietly behind the scenes to scan your incoming email for advanced cybersecurity threat vectors.
Yes! Whenever you are sending sensitive documents to colleagues outside of your own organization, it's easy to encrypt the information in the email before you send it.
Step 1: Create a new email in Outlook by clicking the "New mail" button
Step 2: At the beginning of the subject line where it says "Add a subject", type the following (including the brackets): [encrypt]
Step 3. Leave a space after the second bracket and type your subject - if your subject was an upcoming meeting, your subject line would look like this:
[encrypt] Upcoming Meeting
Step 4: Once you are done composing your email, send it as usual. Proofpoint will encrypt the email automatically and deliver it securely to the recipient.
Step 5: You will receive a confirmation email from Proofpoint letting you know that your message has been encrypted and sent.
Note: The recipient of your email will receive an email notification informing them that they have received an encrypted email. They will be able to access the content of the encrypted email by clicking the "view encrypted email" button in the message and logging into (or creating) their Proofpoint account.
Whether you choose Proofpoint or one of the other products we’ve outlined previously, it’s important to have an email security tool to protect against advanced cybersecurity threats that enter your organization through email.
Email is one of the prime ways that hackers gain access to your infrastructure. Using a product like Proofpoint that separates out suspicious email traffic is one way to add a layer of security.
In this article, we’ve provided a top-level explanation of Proofpoint tools and what they do. We also tackled six essential tips to know when using Proofpoint tools.
You know what to do with the Quarantine Digest.
You also know how to restore a blocked email message, how to release a quarantined email, how to move an email address from the blocked to the allowed sender list, whether you need an app to use it, how it helps encrypt email messages you are sending externally, and whether you need an email security tool.
At this point, you have the working knowledge you need to decide whether Proofpoint or another email security tool makes sense for your organization.
If you are leaning toward Proofpoint as a solution, you now have the information you need to use it effectively.
If you find yourself looking for additional information about Proofpoint, another email security solution, or any other technology tool, click the button below and one of our technology solutions experts will schedule a phone call at your convenience.